News: Now offering a 90-day money-back guarantee!
Learn more
News: Now offering a 90-day money-back guarantee!
Learn moreIn general, check-ins are a great way of keeping track of meeting interactions and recording them right when they happen. These are date- and time-stamped notes tied to every account you import into your Badger Maps account so you can keep track of what happened in every meeting.
Check-ins are also useful for everything from generating sales reports to a quick refresher before a meeting starts.
Standard check-ins will be time- and date-stamped, you’ll also be able to record the type of meeting you had and notes.
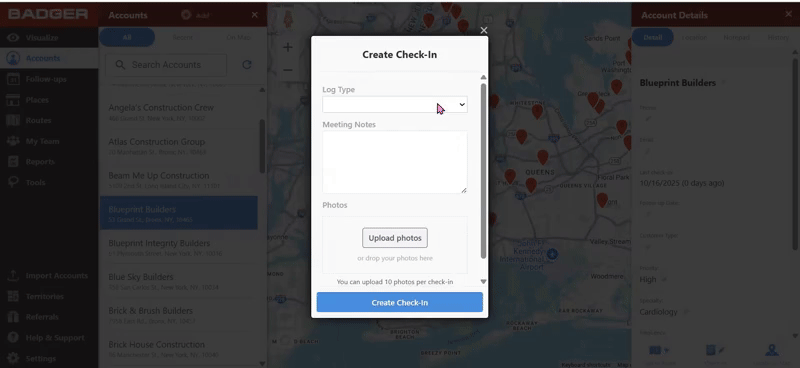
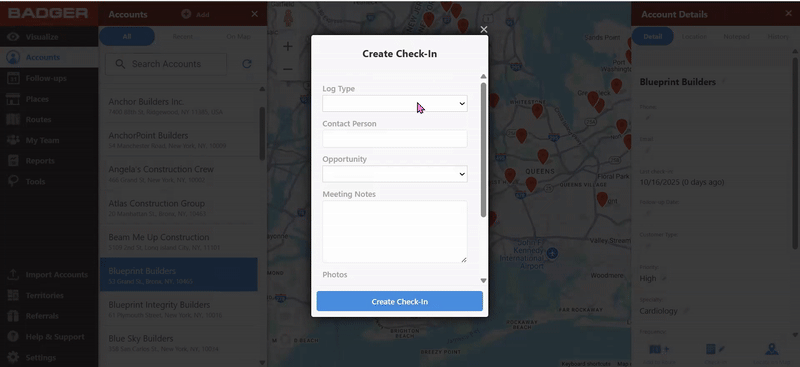
Custom check-ins provides a lot of flexibility and can be created based on you and your organization’s needs. You can add customization to the check-in form to include the following field types: Log Type forms/Drop Down menus, One-line text boxes, and Multi-line text boxes.
Log Type forms/Drop Down menus: This form allows a you to choose one option out of a pre-set list. This is commonly used for noting down meeting types, account statuses, if you talked to the decision maker, and territories.
One-line text box: This is a text box that only holds one line of text. This is meant for shorter text notes like the decision maker's name, number of employees, or number of products at a site.
Multi-line text box: This is for long form notes and the sizing of the box can be adjusted. This is meant for notes like how the meeting went, next steps, and any general notes about the meeting that need to be recorded.
Fields can also be marked as required so that users cannot save a check-in until all required fields are filled.
Customizations are available so that you and your team are able to collect the details you want from the field in a way to stay organized and efficient.
Want to add custom check-ins? Let us know what you’d like and we’ll set you up.
To create a check-in on your iPhone:
All created check-ins from any devices will be saved in the “History” tab.
See the interactive video on how to create check-ins on iPhone.
To create a check-in on your Android:
All created check-ins from any devices will be saved in the “History” tab.
To create a check-in on the web app:
All created check-ins from any devices will be saved in the “History” tab.
Your weekly Check-in reports are automatically sent to the email address you registered with Badger, every Friday afternoon. But you can export it any time from the web app so that you can create on-demand sales reports, or track your progress through a specific period of time.
1. Login to web version of Badger Maps, and click Reports.
2. Choose the date range you would like to export check-ins for. You can either (1) select the date by accessing the calendar and choosing the start and end date or (2) click the icon with three bars next to the date and choose a pre-set date range.
3. Click Export Check-ins to download your check-in report and a download will begin in your browser

The Reports tab also shows your 30-day check-in chart. You can click Make Larger for a larger view, or Download to get a picture file of the chart. Then choose Back to go back to the main screen. This report is great for quickly tracking trends over the last 30 days without having to do any manual analysis.

Another awesome feature of the Check-in tool is that you can save photos on your Check-in entry. Here’s how you can upload them using the web, Android, and iOS apps.
1. First, fill out the check-in form.
2. Then click on the Upload Photos button, and select the photo that you want to upload.
3. Or, drag and drop the picture/s into the Photos box.
4. Lastly, click the Create Check-In button to save your work.
Click here for the full guide.

1. Open up the Badger Maps app, and choose the account that you want to check-in to.
2. Fill out the Check-In form, and tap Add Photos.
3. Choose if the photo is from your phone’s Gallery or Camera, then select the picture that you want to upload.
4. Tap Save, and you’re done.
Click here for the full guide.
1. Tap on the account that you want to check-in to. Fill out the Check-In form, and tap Add Photos.
2. After that, you’ll be asked to select if the photo is from your Gallery or Camera.
3. Choose the picture that you want to upload, and tap Save when you’re done.
Click here for the full guide.
One of the most powerful aspects of creating Check-ins in Badger Maps is have complete access to these notes in the format you need wherever you go.
Combined with the mobile app and routing, you’ll be able to easily read the notes and history of each account before your meeting to get a quick refresher. This means you’ll always start your meetings right where you left off in your last meeting, so that you can move the conversation forward every time.
When new reps are taking over an existing territory, all history (notes and check-ins) of these accounts are kept in your organization’s Badger account.
New reps are able to quickly see all their new territory’s composition and get familiar with their new accounts through the account’s historic notes and check-ins with Badger. When your new reps meet their accounts, they’ll be able to continue the relationship where the last rep left off so nothing is ever lost.
Learn more about how L’Oreal cut trained their new reps in half the time here.
As a sales rep, you’re spending hours driving and meeting customers - you don’t have enough time to build detailed sales reports from all your notes and meetings from the week. Badger simplifies this process by allowing you export check-ins. Check-ins for any team are always formatted in the same exact way with the same value options. What this means is that you’ll have to do minimal editing and you’ll always have clean data to create reports out of. Most users will just send their check-in reports to their managers as their sales report.
If you have management options in Badger Maps, you’re able to export the check-ins of all members in your Badger Maps team to further minimize the amount of back and forth needed when reports are due. You have access to this data to do analysis, forecasting and strategically plan for your team’s next week, quarter, and year.
Looking for our logo?
Grab a Zip packed with our logo in PNG and EPS formats.