News: Now offering a 90-day money-back guarantee!
Learn more
News: Now offering a 90-day money-back guarantee!
Learn moreLike our web app, the iPhone app also has the Lasso tool to help you manage a bunch of accounts all at the same time. In this article, we’ll teach you how to use that tool to create your routes. Continue reading to find out how.
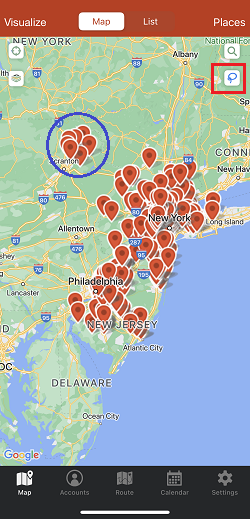
1. Go to the Map screen, and tap the Lasso icon. The icon should turn blue to show that you can start using the tool, then draw around the pins that you’d like to include on your route.

2. Tap create route once the Lasso screen pops up.

3. After that, the app will open up the Current Route screen. Tap the Enter Start Location box to add your starting point, then scroll down and tap the Enter End Location box to add your ending point. Click here if you want to find out how you can set a default start and end locations.


4. Tap Optimize to get the most efficient route to take, then tap the save button.


5. Assign a Route name and Route Date, tap Save when you’re done, and you’re good to go.


That’s it. You just learned how to use the Lasso tool to build your routes on your iPhone. Safe travels!
Looking for our logo?
Grab a Zip packed with our logo in PNG and EPS formats.