News: Now offering a 90-day money-back guarantee!
Learn more
News: Now offering a 90-day money-back guarantee!
Learn moreIf you prefer to build your routes on your computer and use your iPhone in the field, you don't have to worry about manually adding your appointments on your iPhone calendar. You can easily push your routes to your iPhone calendar through these easy steps.
1. You'll need to set up the email address linked to your Badger account on your iPhone. Go to your iPhone's Settings --> Passwords & Accounts, and click on Add Account. You will be prompted to sign in.


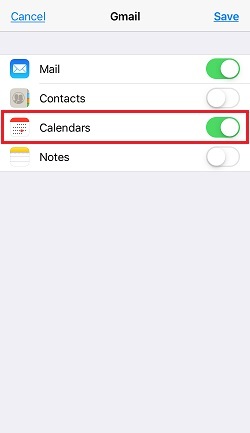
2. Once signed in, you will need to turn on the Calendars by ticking on the icon beside it. It should be colored green. Save the changes.
3. Then go to the iPhone Calendar app, and click on Calendars. Check the email address that you used to sign in earlier. Click on Done to save this setting.


4. Now that you're all set on your iPhone, log in to the web app and export your routes. Here are the links to our step-by-step guides on how to export your routes depending on the type of calendar you're using.
How to Export Routes to an Outlook Calendar (WebApp)
How to Export Routes to a Google Calendar (WebApp)
Click here if you've already exported your Badger routes to your Google calendar, and want to integrate it with your iPhone calendar.
5. After exporting to your respective calendars, your appointments will be automatically added to your iPhone calendar. Just go to your iPhone's Calendar app, and choose the date of the route to view your appointment list.

Looking for our logo?
Grab a Zip packed with our logo in PNG and EPS formats.