News: Now offering a 90-day money-back guarantee!
Learn more
News: Now offering a 90-day money-back guarantee!
Learn moreWhen you connect your Badger Maps account to Zapier, you have access to thousands of other apps available in their system. This way, you’ll be able to integrate Badger with your CRM without any developer work.
Before you start: email us at support@badgermapping.com requesting that your API key is turned on. This will allow for data to flow through from your Badger Maps account into other platforms.


Copy the API key and paste it into the “Allow Zapier to access your Badger Maps Account”? Window and click the “Yes, continue” button.
You’re done! You can now connect your Badger Maps account a multitude of different tools and apps.
A trigger is an event that you want to “listen” for or are waiting to happen. This means that Zapier will wait for that particular trigger to happen and continue with the rest of the zap.
This triggers whenever you or someone you manage in Badger adds an account to their Account list.
If no sample is coming up as you test the step, add a new account to your accounts list in Badger Maps and try again.
You can expand each sample to see if it contains all the details you’re looking for.

When you bring in new accounts to and from Badger, we recommend that you have some sort of unique customer/contact/lead ID to identify your customer. This will ensure that information is going into the right account in Badger Maps and the platform you’re integrating us with. When you create accounts in Badger and most CRMs, they will already have unique IDs. It’s important to keep this in mind!
This triggers whenever a new check-in is saved an account you own or someone you manage owns.
You can use this trigger to send date- and time-stamped meeting notes to your CRM as they occur.
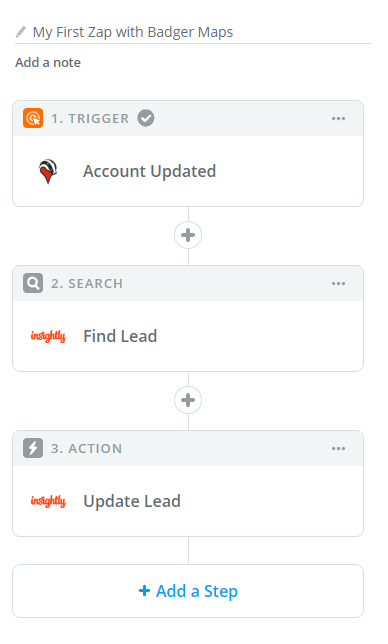
This trigger whenever an account detail is updated in an account you own or someone you manage owns.
For example, this will trigger if you change the phone number, a custom field, or even the address of an account. This will also trigger if you are a manager in Badger Maps and one of your teammates edits any field in Badger Maps.
In order to find the correct account in your CRM or another platform, you will have to add a step where you “Find” that account by some unique ID. Then, you can add another step to update that account in your CRM or any other platform.
An action is something you want to create with Zapier.
For example, you can create a zap where it listens for a new lead to be created in your CRM and then it creates an account in Badger Maps with that lead’s information. In this case, the trigger is listening for a new lead and the action is creating an account in Badger Maps.
This action creates a new account in Badger Maps.
When you use this action, there are a few required fields to make sure your account is created properly. The required fields are Account Name, Account Address, and User ID.
Before this step, we recommend that you add a Search: Find User step first to find the correct Account Owner in Badger Maps.
In this Create Account step, all of the fields you have in your Badger Maps account (the fields you see in “Manage Fields”) can also be added via Zapier.
An important field to fill out in this step is the Account External ID field so that you can make sure the flow of information between Badger Maps and your other system is correct.

This action will update an account in Badger Maps based on whenever the first step is triggered.
You may want to set this up when an account is updated in your CRM and you would like the change reflected in Badger. The required fields in this action are Account ID and Account Location ID.
Before doing this step, we recommend that you add a Find Account step first. Then you will be able to use the dynamic variables from this step to make sure that this Update Account step automatically updates the correct account.

Check-ins in Badger are a great way to keep track of all your customer interactions right after they happen. You're able to quickly jot down meeting notes and key pieces of information while you're on the road. This also creates automated sales reports sent to you weekly to reduce admin work.
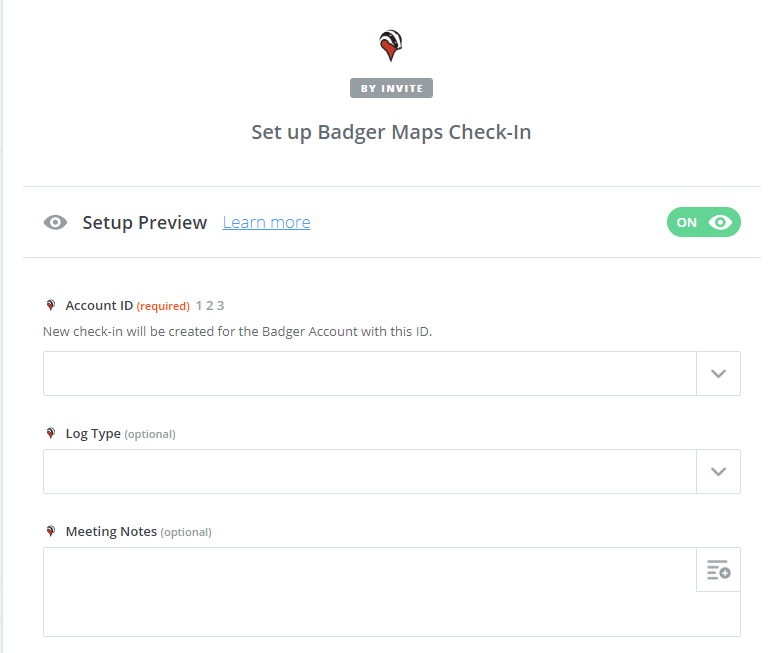
This action will create a new check-in in Badger Maps assigned to the account you would like to check-in at. The only required field in this zap is the Account ID to ensure that the check-in is being sent to the correct account.
If you have custom check-ins, all of your custom fields will appear as optional fields to automatically fill in.
A search is when you would like to find particular information between the apps you would like to connect. For example, this may be your Badger User ID, an Account ID, or even Account Fields. This step is essential for making your zaps dynamic and ensure that your zaps will work for every account you have in Badger or your CRM/ERP system.
This search will find an existing Badger Maps user. You can use this search for when you’re trying to find a user to assign an account to in Badger or trying to assign an account created in Badger to a user in your CRM.

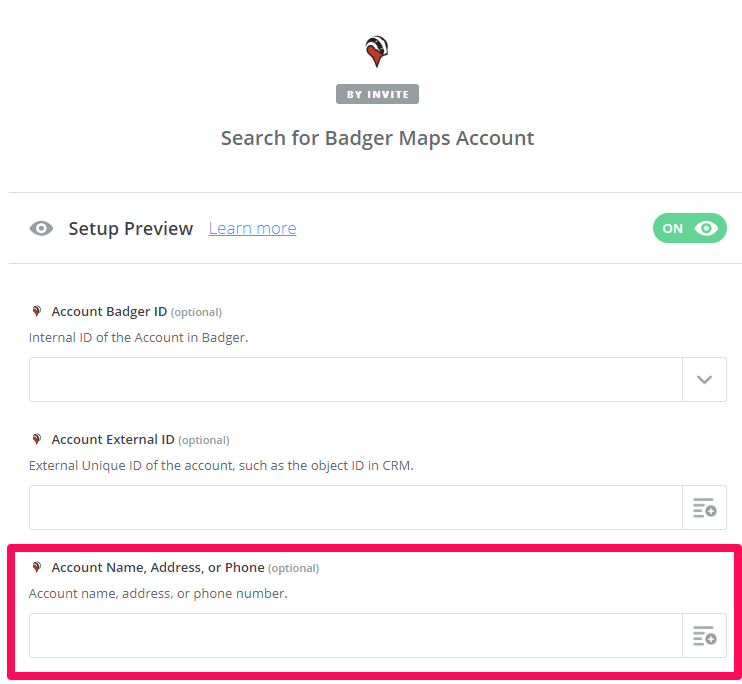
This search will find an account (like a lead, prospect or client) that you or someone on your team owns in their Badger Maps account. There are three ways to find accounts (listed in order of preference):
The first way is to find accounts by Badger ID. You can use the Badger Account ID from the created check-in or updated account trigger to search for this account.

The second way to find an account is via an external ID. These external ID’s will usually come from your CRM or ERP system.

The third way of finding accounts is via Account Name, Address, or Phone Number. You can use this method if you don’t have either the external or internal ID’s but have some identifying information.
This step can only be used with the Badger Map’s Create Check-In Trigger. This action will provide the URLs of all photos attached to a check in that is separated by a comma.
The Check-in ID will be the ID in the New Check-In Trigger.
The Customer ID will be the Customer in the New Check-In Trigger.

If you wanted all photo links separated out, you will need to create a third step. Unlike the other steps, the app in the third step will be Formatter by Zapier. With the Action Event being “Text”.

The Transform will be “Split Text”. Input will be the Check-in Photos URLs (from step 2.) The Separator is a comma. The Segment Index should be “All (as Line-items)”.

This will split out the photos in the Output, where you may use the link(s) in future steps.

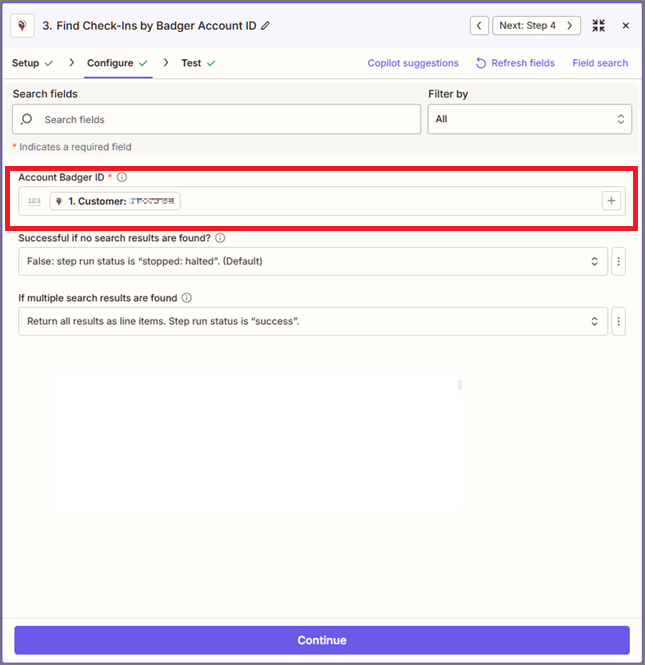
This search finds existing check-ins for a specific account in Badger Maps. It can be used to return the most recent check-in or all check-ins associated with that account.
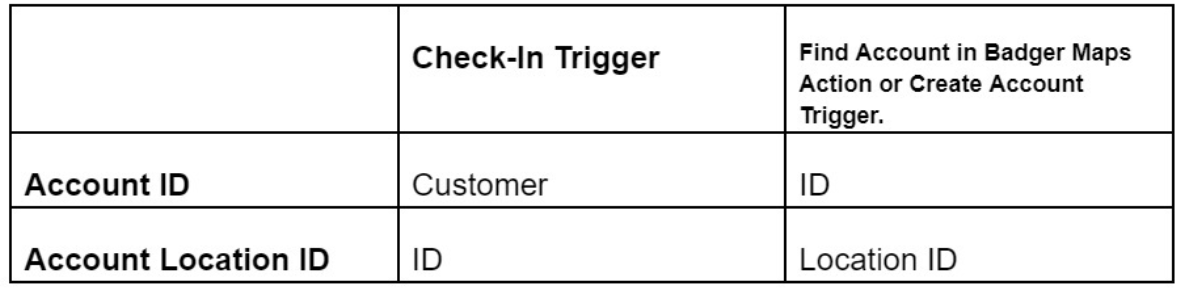
When setting up this step, you will need to map the Account Badger ID. The field label will vary depending on your trigger:
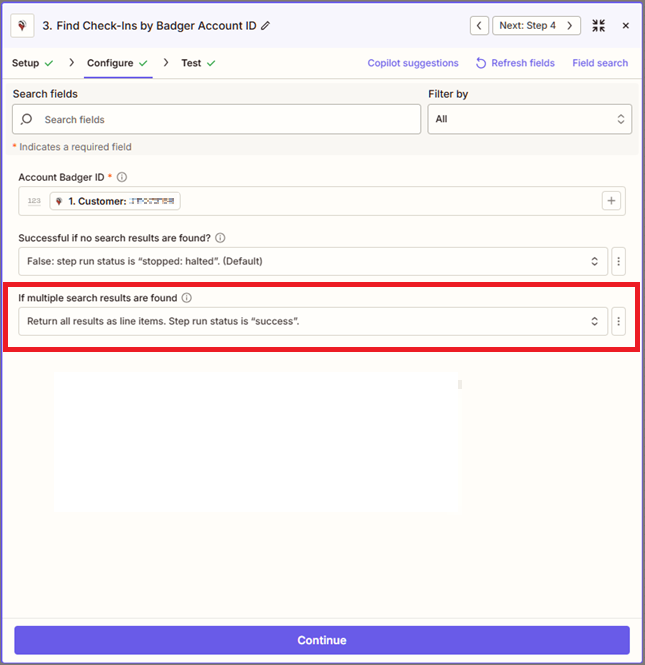
To return all check-ins for the account:
Locate If multiple search results are found
This search finds routes in Badger Maps. By default, it will return the most recent route for the connected account, but it can also be configured to return all routes.
No additional setup is required once your Badger Maps account is connected in Zapier.
If you need to find routes for a specific user, you can map the Route Owner ID.
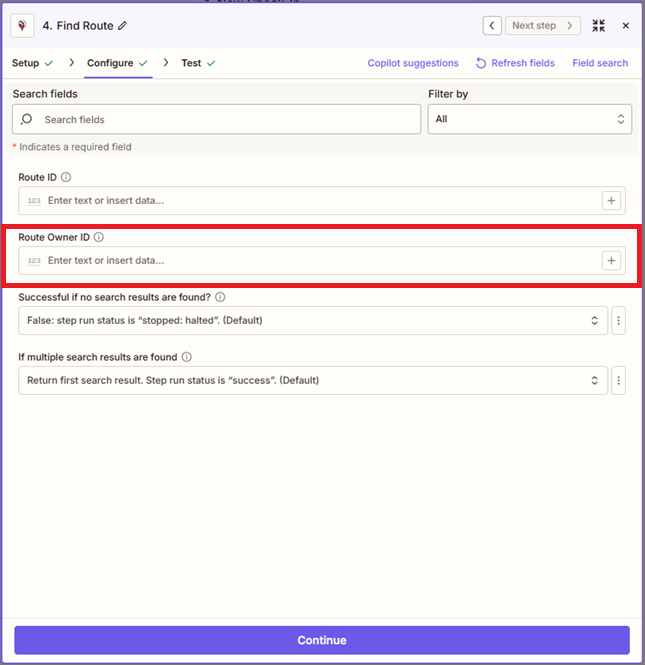
By default, this search returns only one route.
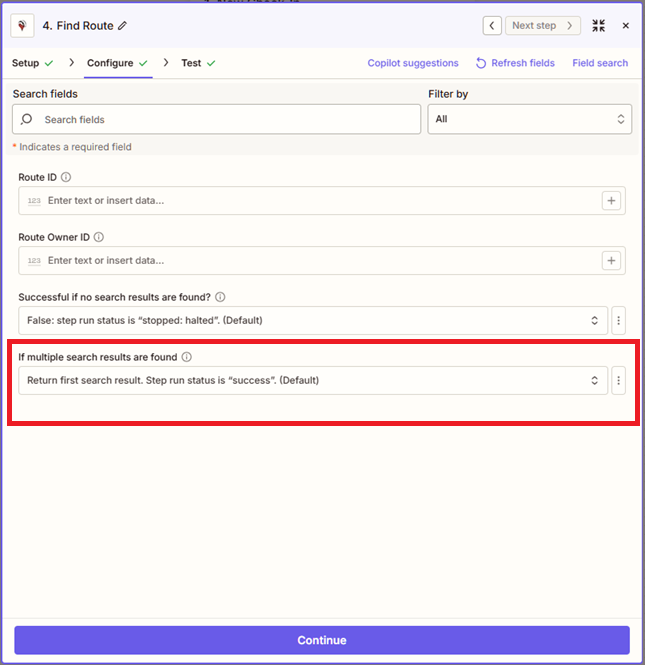
To return all routes:
Each route will include its own Results ID (Route ID) in the output.
If at any point you’re waiting for a test and nothing populates, do that action again in your Badger Maps account and retest. You should be able to get a sample afterwards.
Looking for our logo?
Grab a Zip packed with our logo in PNG and EPS formats.