News: Now offering a 90-day money-back guarantee!
Learn more
News: Now offering a 90-day money-back guarantee!
Learn moreBadger’s got a feature called Navigate that gives you turn-by-turn directions when you go to your appointments. Continue reading below to learn how to use this feature.
During Route Mode
Route Mode was built for you so you can easily access your route and navigate through your day. Just tap Next while in Route Mode to get to your next appointment.
1. Open up your Routes window.

2. If you would like to enter Route Mode for a saved route, tap on Saved Routes then select the route you would like to access.

3. Once the route you chose is under your Current Route, tap on the green GO button found on the bottom of the page.

4. Tapping on this button will activate Route Mode. You will be able to tap on Navigate to open your favorite GPS app to navigate to your next destination. When you're ready to move onto your next step, tap on Next to enter the navigation for that account. From this mode, you'll also be able to check-in easily after meetings.

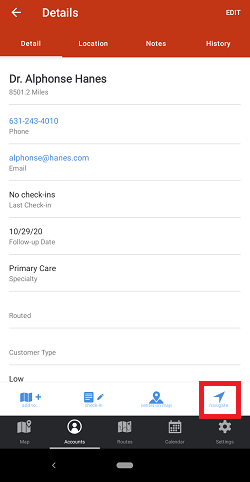
On Accounts
Also, Badger allows you to Navigate through your accounts without adding them as a route stop.
1. Go to Accounts, tap on the account that you’d like to go to, and choose Navigate.


2. Another way is to click on the account pin that you’d like to go to on the Maps screen, then select the Navigate icon.
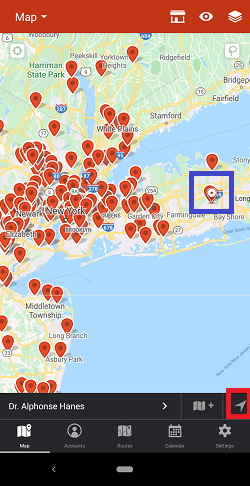
Just make sure to share your current location to get accurate directions. Look at Step 3 of this guide if you don’t know how it’s done.
Pretty easy, right? Here's a video of how you can create and navigate through your routes using the Android app:
Looking for our logo?
Grab a Zip packed with our logo in PNG and EPS formats.