How to Build Filters (Web App)
So, you want to be able to filter through accounts on your map by customizable fields? Here is a step-by-step guide to creating fields to filter your accounts on the map. For all users, this can be done via a spreadsheet import. For users under Badger's Entry Plan, this can also be done directly via the Badger web app (Business and Enterprise Users have data sharing settings that gets in the way of doing this securely).
Via Spreadsheet (for all users)
1. Prepare a new Excel or .CSV file containing the new field values for your account. Please make sure that your Excel or .CSV file follows the format of your original import.
2. Create a new column to the right of our your current headers (e.g. Column H). Give the header the name of the new searchable field. For example, if you want to search by priority, name the column, “Priority”.

3. In the empty cells below the header, you can input information to be filtered. For instance, you can designate each account as either High, Medium, or Low. Do this step for every account that you want to filter based on priority.
4. Repeat steps two and three for any kind of searchable field that you want.
5. Save your Excel or CSV file.
6. Import the file into Badger. (See how here).

7. On the top left side of the screen, you will see a “Visualize” option. Click on the option, and it will bring up the Visualize menu. By clicking "Filters" in the top bar, you will see a list of all of your new filtering options.
8.On the top left side of the screen, you will see a “Visualize” option. Click on the option, and it will bring up the Visualize menu. By clicking "Filters" in the top bar, you will see a list of all of your new filtering options.
9. If you want to only see high priority clients, scroll to the section "Priority Filter" and deselect Low and Medium. Now, you will only see your High priority clients on the map.
10. Congratulations! You can now easily filter through your accounts.
Via Badger Web App (for Entry Plan users)
If you are under Badger's Entry Plan, you can also create filters directly through the Badger Web App.
1. From Badger's main menu, click on "Settings" near the bottom left corner of the screen.

2. Under the "Settings" menu, click "Manage Fields".
3. Scroll down to the bottom of the window to the bar named "New Account Field Name". Here, you can add a new field to filter your customer accounts.
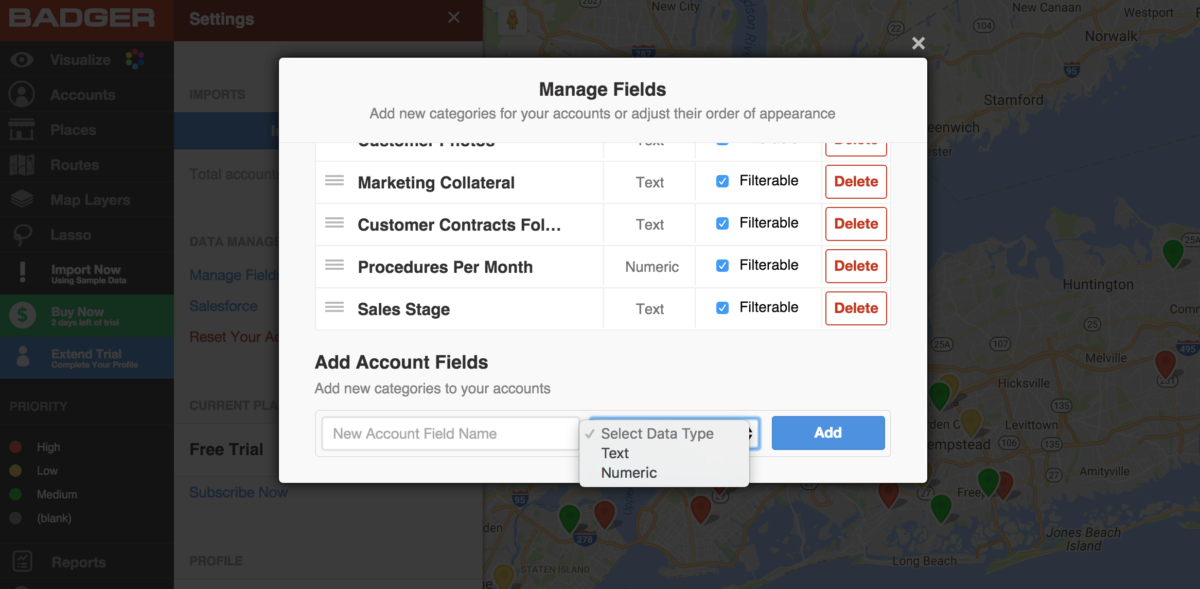
4. For the "Select Data Type" drop-down menu, choose "Text" or "Numeric" to set the type of values to represent your new information. Choosing "Text" will filter the field values by a distinct text value, while "Numeric" will filter the values by a range of numbers.
5. To assign values to your new filterable field, you can either individually add new information into each accounts' details, or use the lasso tool to mass update the same information across multiple accounts. Learn how to mass update here.
Note: Once you have created your new field, look at the list in "Manage Fields" and make sure that the box next to "Filterable" is toggled on.
6. Return to the main menu, and click on "Visualize" on the top left side of the screen. By clicking "Filters" in the top bar, you will see a list of all of your new filtering options.
7. If you want to only see high priority clients, scroll to the section "Priority Filter" and deselect “Low” and “Medium.” Now, you will only see your clients with the value "High" assigned to their Priority field.
8. Congratulations! You can now easily filter through your accounts.
The video below shows you how to use visualization tools to colorize and filter your accounts on the map on your computer.